| 173
|
CHAPTER 29
Making Wheelchairs from Trash:
Innovations in War-Torn Angola
Disabling Civilians as a Tactic of Low-Intensity Conflict
As a result of decades of civil war, ANGOLA, a
country in south-west Africa, has the highest rate in the world of people
who have lost legs from land mines. Guerrilla troops, sponsored by the
former apartheid (white rule) government of South Africa, have planted
millions upon millions of mines. Those injured are mostly civilians,
including women and children. Supplied by giant arms manufacturers in the
North, LAND MINES ARE DESIGNED TO CRIPPLE, NOT TO KILL.
This is part of the strategy of "low-intensity conflict." Leaving people
seriously disabled puts a greater burden on families and on the nation
than does killing people outright.
National Rehab Centers in Angola - A Chronic Shortage of Materials
To do something for the vast numbers of civilians disabled by war, the
government of Angola set up large rehabilitation centers in each province.
These were intended to provide disabled persons with rehabilitation,
assistive devices, and training in skills such as leather-work and
carpentry, so they could soon return to their homes. But at the centers -
as in the whole war-torn and economically devastated country - there was a
chronic shortage of even basic materials such as leather, wood, nails, and
glue. As a result, neither assistive equipment nor skills training were
being provided. The rehab centers had become little more than long-term
holding camps - sheltered workshops with no work.
To try to find a way out of this situation, in 1990 the Ministry of
Social Affairs together with the Development Workshop (a Canadian
non-profit group) organized a national workshop. One director and one
disabled person from each of 15 provincial centers attended. The author
(David Werner) and Kennett Westmacott were among the outside facilitators.
A National Workshop to Develop Equipment and Skills
THE GARBAGE DUMP AS A SOURCE OF SUPPLIES
The purpose of the workshop was to figure out how to make assistive
devices at low cost and with a scarcity of tools and materials.
Rather than simply discuss how to make do with minimal resources, we
decided to actually try to make needed aids and equipment for and with the
disabled participants. if they themselves could master these skills, they
could then not only help meet needs of other disabled persons, but they
would have important work.
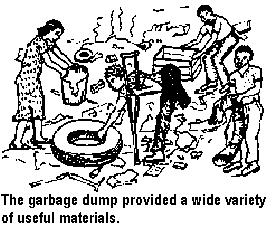
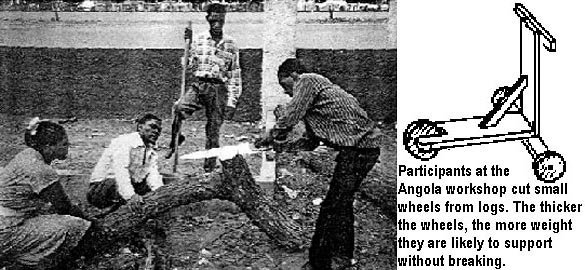
To find materials, we first made a trip to the city dump. We collected
bits of wire, old plastic buckets, car tires, inner tubes, and bits of
metal. About the only wood available was from broken packing crates left
over from international aid shipments. Also, there were branches that
could be cut from the few remaining ornamental trees.
|
| 174
|
STARTING WITH BARE HANDS AND SHARP EYES
To start off the workshop, Kennett showed the group how to make a saw
by filing teeth into the steel strapping from old packing crates. The
blade is stretched between a frame made from sticks, and tightened by
twisting a wire.
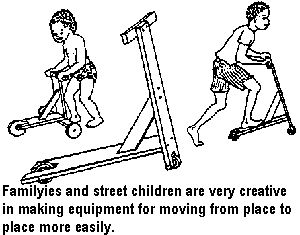
To get ideas for building things from scrap, we went into the streets
and watched children playing with their homemade scooters, pushcarts,
and baby carriages. The wheels of these were made of wood, or with large
bearings from junked or bombed trucks. The ingenuity of the street
children, inventing playthings out of anything at hand, was an
inspiration and challenge to all.
|
| 175
|
LEARNING TO MAKE ASSISTIVE DEVICES.
 During
the 2-week workshop, the group managed to make a wide variety of
assistive devices. These were mostly created to meet the expressed needs
of the disabled participants. During
the 2-week workshop, the group managed to make a wide variety of
assistive devices. These were mostly created to meet the expressed needs
of the disabled participants.
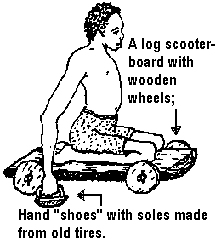
For example, one participant, named KOFI, had
paralysis in the lower body, with hip and knee contractures. He scooted
about on his backside using his hands. He wanted some way to move faster
and easier. So the group designed and made for him:
 | A log scooter-board with wooden wheels; |
| Hand "shoes" with soles made from old tires. |
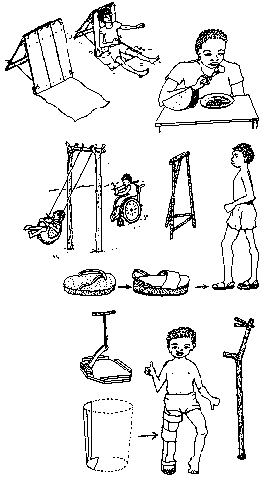 |
To meet a wider range of disability needs, the
workshop invited disabled adults and children in the local community
(on the outskirts of Luanda) to visit. Devices that the workshop
participants created to meet the needs of these visitors included:
| A foldable sitting frame for a disabled child |
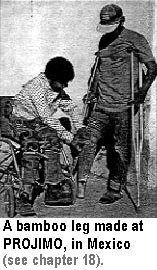
| Artificial legs (both rustic and prefabricated) (see
page 180) |
| An arm rocker, so that a person with a paralyzed arm can feed
herself |
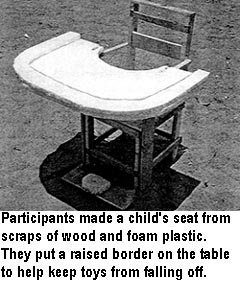
| A special seat with a table made of foam plastic (see
page 179), and toys for a child with cerebral
palsy |
| An enclosed swing made from an old tire, turned inside out
(see page 57) |
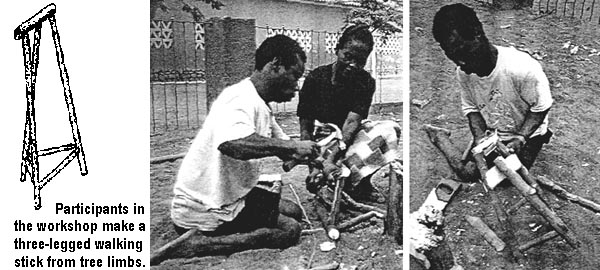
| A 3-legged walking stick made from tree branches (page
174) |
| Ramps for wheelchair access and exercise (see
page 230) |
| An orthopedic lift for a sandal or shoe, made from old
foam-rubber "thongs" |
| Under-arm and elbow crutches, made from tree branches |
| A tray for disabled persons to transport drinks without
spilling them (see Chapter 22, page 135) |
| Wheels, pieced together from old wooden packing crates (see
the next two pages) |
| A wooden wheelchair, made from packing crates (see
page 178) |
| Leg braces made from an old plastic bucket, especially
designed for a little girl with severe bowing of the knees. |
|
|
| 176
|
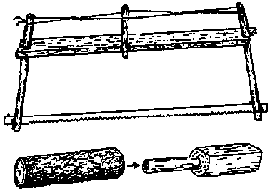
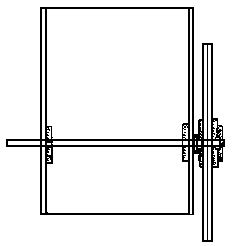
HOW TO MAKE A WOODEN WHEEL 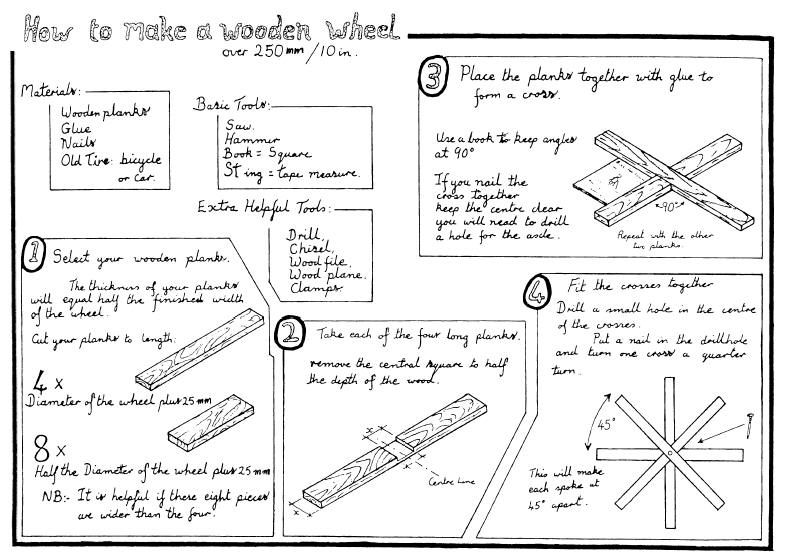
Materials: Wooden planks, Glue, Nails and Old Tire(
bicycle or car).
Basic Tools: Saw, Hammer, Book (square), Sting (tape
measure).
Extra Helpful Tools: Drill, Chisel, Wood file, Wood
plane, Clamps.
- Select your wooden planks.
The thickness of your planks will equal half the finished width of the
wheel.
Cut your planks to length:
- 4 x (Diameter of the wheel plus 25 mm).
- 8 x (Half the diameter of the wheel plus 25 mm).
- NB: It is helpful if these eight pieces are wider than the four.
- Take each of the four long planks.
Remove the central square to half the depth of the wood.
- Place the planks together with glue to form a cross.
Use a book to keep angles at 90 degrees.
If you nail the cross together, keep the centre clear.
You will need to drill a hole for the axle.
Repeat with the other two planks.
- Fit the crosses together.
Drill a small hole in the centre of the crosses.
Put a nail in the drillhole and turn one cross a quarter turn.
This will make each spoke at 45 degrees apart.
|
| 177
|
|
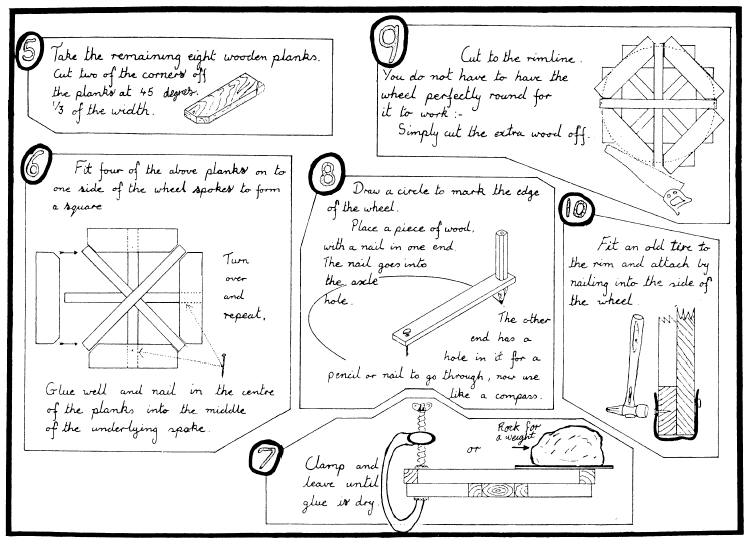
- Take the remaining eight wooden planks.
Cut two of the corners off the planks at 45 degrees, one third of
the width.
- Fit four of the above planks on to one side of the wheel
spokes to form a square.
Glue well and nail in the centre of the planks into the middle of
the underlying spoke.
Turn over and repeat.
- Clamp (or rock for a weight) and leave until glue is dry.
- Draw a circle to mark the edge of the wheel.
Place a piece of wood with a nail in one end.
The nail goes into the axle hole.
The other end has a hole in it for a pencil or nail to go through,
now use like a compass.
- Cut to the rimline.
You do not have to have the wheel perfectly round for it to work:
-
Simply cut the extra wood off.
- Fit an old tire to the rim and attach by nailing into the side
of the wheel.
|
| 178
|
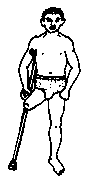
A WHEELCHAIR FOR MOSES
One of the workshop participants, MOSES,
had been disabled by a land mine. He walked with great
difficulty, supporting his weight with a pole. Moses very much
wanted a wheelchair. At first this seemed virtually impossible,
given the !ack of key materials, especially wheels. But the
group was determined to try. The best building material they had
was poor-quality, half-inch-thick planks they had scavenged from
o!d packing crates.
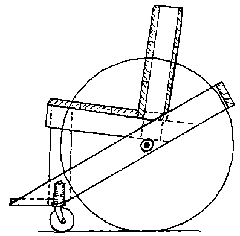
With suggestions from Moses and others, the group drew an
initial design for a wooden wheelchair. When the final design
was agreed upon, the drawing was enlarged to full size on
packing paper, so that the different pieces could be traced onto
suitable pieces of wood.
Kennett Westmacott had already taught the participants how to
piece together large wooden wheels, using scrap wood from the
packing crates. The group put together the wheels and the entire
chair using nails pulled out of the packing crates and then
hammered straight.
The outer edge of the big wheels were covered with strips of
rubber cut from old car tires.
Instruction sheets for making the large wheels were provided
by Kennett, and are reproduced (with minor modifications) on the
two pages before this one.
With 4 small ball-bearings they had found, they mounted the
back wheels on an axle made from a length of 3/4 inch
reinforcing rod. The bearings were force-fitted (with a hammer)
into inset-holes chiseled into square pieces of Angolan
hardwood, found by the scavengers.
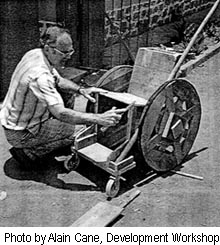
For the small front wheels of the chair, participants had
hoped to use large truck bearings, similar to those that the
street children use for scooters. But the bearings proved
difficult to find. At last, someone located a couple of old
plastic caster wheels, so these were used. No welding was needed
for any part of the wheelchair.
By dividing into small groups that worked at the same time on
different parts of the project, the chair was completed in 4
days. It was remarkably sturdy and functional. Moses, who had
played a key role in building his chair, loved it. As a last
addition, he built a small box on the outer edge of the wooden
footrest to hold the front end of his walking stick. |
| 179
|
AN OUTCOME: MUTUAL RESPECT GAINED BY DIRECTORS AND DISABLED
PARTICIPANTS
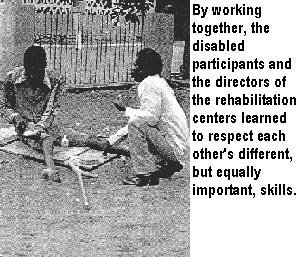
Perhaps the most worthwhile part of the workshop was the
understanding and respect that grew between the members. At the
start, the directors of the rehab centers were hesitant to take
part in the manual work. They were reluctant to put themselves
on an equal footing with the disabled participants, many of whom
were unschooled villagers. The disabled persons, in turn, seemed
unsure of themselves and uncomfortable when working alongside
the administrators.
However, in the process of working and problem-solving
together, everyone began to relax and to appreciate each other's
skills. In some areas, such as measuring and interpreting
graphic designs, the officials were more able. But in the use of
tools and building of devices, many of the people with
disabilities were obviously more capable. Each group learned
from the other. By the end of the workshop, a strong sense of
camaraderie had developed, and everyone seemed more confident.
THE BEGINNING OF AN ORGANIZATION OF DISABLED PEOPLE IN
ANGOLA
Another important outcome of the workshop was unplanned. The
disabled participants, who came from many parts of the country,
recognized that they had a lot of common concerns. They also
realized that, by working together to try to solve one another's
problems, they could accomplish a lot.
As a result, they began to talk about forming some kind of a
network, or organization. This was significant because, at that
time, there was no association of disabled people in Angola.
However, there was a major barrier to forming such an
organization. At that time, because of all the terrorism and
social unrest, the government prohibited all popular
organizations, even at the community level. Fortunately, a high
official in the Ministry of Social Affairs attended the closing
ceremony of the workshop. The disabled participants presented to
her their need and desire to form a national organization of
disabled people. The official promised to arrange permission for
this. We learned later that permission was granted, and an
Angolan branch of Disabled People's International has
now become a reality.
|
| 180
|
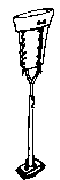
NEED TO PREPARE THE STUMP BEFORE FITTlNG AN ARTIFICIAL LEG
One of the workshop participants had lost his leg due to a
land mine. The group made plans to create a make-shift limb out
of bamboo or PVC (plastic pipe) for him. (Designs and
instructions for both types of limbs can be found in the book,
Disabled Village Children.)
However, when a leg-making team from the Swedish Red
Cross visited the workshop, they brought a fully
adjustable, low-cost prosthesis (artificial limb)
created from local materials. Both the socket and the length of
the leg could be quickly modified to fit different persons.
This limb had a laced leather socket attached to a thin steel
tube. The length of the tube could be adjusted by a simple
telescoping mechanism.
The Red Cross team attempted to fit the limb to the amputee
in the workshop. However, they ran into a problem. In the 3
years since his amputation, the man had developed contractures
and muscle weakness in the hip. Also, the stump was swollen and
flabby. All of this made accurate fitting and safe
weight-bearing on the adjustable limb impossible.
From this failed attempt, participants realized that
an artificial limb is only a part of the rehabilitative need of
an amputee. In the period between losing the limb and
getting a prosthesis, it is important that the person:
- Do exercises to maintain strength and prevent
contractures, and
- Keep the stump bandaged, to prevent swelling and
puffiness.
An instruction sheet on stretching and strengthening
exercises (partly adapted from the book, Disabled Village
Children) was developed by the workshop facilitators. It
was given to all participants so that they could work with other
amputees in the different centers. That way, when there was an
opportunity to get an artificial limb, the chances for
successful fitting and use would be greater.
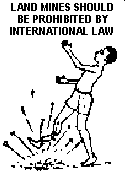
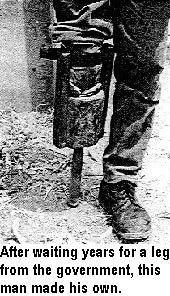
THE ENORMOUS NEED FOR ARTIFICIAL LIMBS - AND AN END TO
VIOLENCE
Everyone agreed that there was a great need for
dozens of small, decentralized limbmaking workshops in
the provinces, preferably with disabled persons as technicians.
Today, Angola has tens of thousands of amputees waiting for
limbs. Although the war has more-or-less ended, hundreds of
thousands of land mines still cover the landscape. So thousands
of men, women, and children will continue to have their legs
blown off.
Workshop participants realized that the only
long-term answer is to outlaw land mines by international law.
But that would be just a beginning. Corporate rule, and the
power of the multinational arms industry must also be
confronted, as well as the unfair distribution of wealth and
power that leads to so much poverty, crime, internal strife, and
institutionalized violence. Disabled people need to join
with other marginalized and disadvantaged groups in the struggle
for a kinder, fairer world. (See the book,
Questioning the Solution for more on the politics of health
and disability. See page 344.) |
| 181
|
Learning From and Admitting Our Mistakes
The illustrated instruction sheet shown below was developed
at the Angola workshop. Copies were made for participants to
take back to their centers, to help persons who had lost a leg
maintain the movement and strength needed to successfully use an
artificial leg, if and when they got one. (Another information
sheet gave instructions on how to bandage the stump, to prevent
the swelling and flabbiness that make it hard to fit a limb.)
Unfortunately, the original exercise sheet, although it was
designed by rehabilitation professionals, had some problems. The
mistakes were pointed out to me, years later, by Ann Hallum, an
outstanding physical therapist who reviewed the manuscript of
this book.
Question: Some of the exercises shown
below should usually be done differently, or not be done at all.
Do you know which ones? And why?
Answer: CAUTION with exercises 1, 3, and 4.
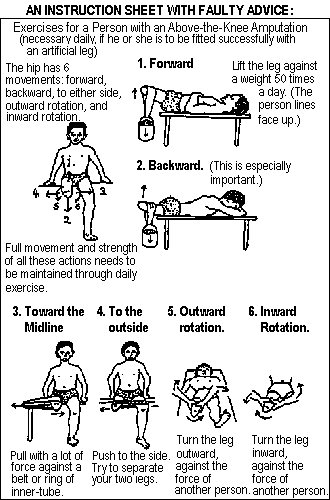
Exercises 1, 3, and 4 should be done differently.
They can lead to muscle imbalances and contractures that make
walking with an artificial limb much more difficult.
After the loss of a leg, the person tends to hold his stump
lifted up and out, like this.
By doing this, he uses and strengthens the muscles that bend
the stump up and out, more than those that bend it in and back.
This results in a muscle imbalance that can lead to contractures
that will interfere with walking.
Therefore, it is best to do exercises to strengthen
the weaker muscles that can help combat contractures. And
stretch (but do not strengthen) muscles that contribute to
contractures.
To combat contractures, Exercise 1 should be done to stretch,
not strengthen. Exercises 3 and 4 should be done lying down (to
reduce flexion contractures of thigh). And if you do exercise 3,
avoid opening the thigh to the side past mid-line.
A corrected version of this exercise sheet is shown
on the next page ... Live and learn! |
| 182
|
This is the corrected
version of the Exercise Sheet shown on the preceding
page.
Exercises for a Person with an Above-the-Knee Amputation
(necessary daily, if he or she is to be fitted
successfully with an artificial leg)
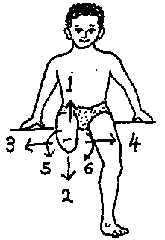
The hip has 6 movements:
- 1) forward
- 2) backward
- 3, 4) to either side
- 5) outward rotation,
- 6) inward rotation.
Full movement and strength of all these actions (except
the first) need to be maintained through daily exercise. |
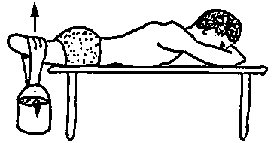
 1.
Forward Movement* 1.
Forward Movement*
CAUTION: Use this exercise to stretch
the muscles that flex the thigh, not to strengthen them.
Don't lift against the weight; let it pull the thigh
backward. Bend the other knee up, to prevent the lower back
from bending instead of stretching the hip. It is usually
best to avoid exercises that strengthen forward-lifting of
the stump (hip flexion).
As a general rule: DO THIS EXERCISE. ONLY TO STRETCH THE
STUMP DOWN. DO NOT LIFT IT UP. |
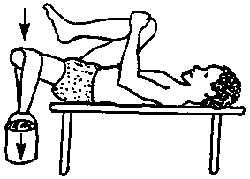
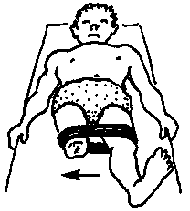
2. Backward
(This is especially important for being able to walk with a
full range of motion.)
Lift against weight 50 times a day. (The person lies
face-down.)
|
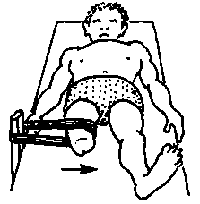
3. To the outside
Push to the side, trying to separate your legs.
(But do this so that the stump stays in the mid-line,
and does not sving out to the side.)
|
4. Toward the mid-line
Pull with a lot of force against a belt, or a ring of
inner-tube.
|
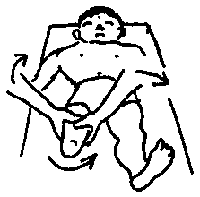
5. Outward rotation
Turn the leg outward, against the force of another
person. |
6. Inward rotation
Turn the leg inward, against the force of another
person.
*Note: With Exercise 1, it is important to let
the hanging weight stretch the hip down. Do not try to
lift the stump. This will help avoid hip flexion
contractures (inability to straighten the hip) that would
make walking more difficult. For a similar reason,
do Exercises 3, 4, 5, and 6 lying down.
|
|
|