| 135
|
CHAPTER 22
Non-Spill Trays: A Personal
Invention Shared with Others
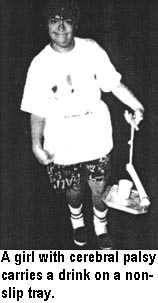
Some disabled persons have a problem carrying jars, glasses,
and pots of food and drink. If a container falls, it can be dangerous.
The difficulty is greater for persons with only one arm, with half of
their body paralyzed (paraplegia), or any condition that causes
shaking or uncontrolled movements.
PETER AND MARIANNE WEST are a married couple
in England. Both have cerebral palsy. Both have trouble carrying
drinks because of what they call the wobble factor.
In their search for solutions, they learned of a large,
commercially-made fiberglass tray with an overhead handle, which was
advertized as spill-proof. But it was no longer available.
|

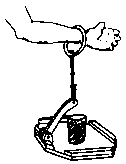
Peter designed a simple, wooden non-spill tray to meet his own and
his wife's needs. He got the idea for the design from a tray used for
carrying coffee in Arab markets. The tray can carry a lot of cups and
glasses, and packs flat for storage in a small kitchen.
Peter now teaches people how to make the tray in a community
workshop called People Potential (see
page 342) where he and Kennett
Westmacott give disabled persons and family members courses in
"Resources and Creativity," and "Appropriate Disability Design." He
and Kennett have taught many others to make the tray in various
countries.
|
I first saw the tray being made and used
in a disability skills workshop in Angola (see
Chapter 29).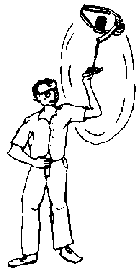 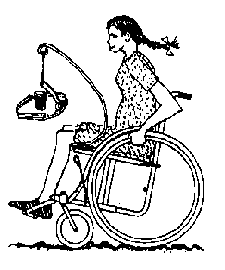
The non-spill capacity of the tray is quite amazing. It can be
swung from side to side, and even whirled in a circle overhead,
without spilling the liquid in a cup.
The tray can be adapted to meet individual needs. For example, for
a person who has difficulty gripping (because of arthritis, leprosy,
etc.), you can attach a handgrip of clay, plaster, or putty to the
handbar. Also, the tray can be fitted onto a holding device on a
wheelchair, to carry containers over uneven ground. |
|
| 136
|
How to Make a Non-Spill Tray
(These instructions are adapted from CeR News No 17, May-Aug , 1994.
Drawings by Celia Till/AHRTAG. Text by Peter West )
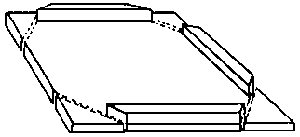
1. The base of the tray starts with a square (as large or
as small as will meet your needs). Cut off corners, as shown. Glue
small piece of wood to 3 sides.
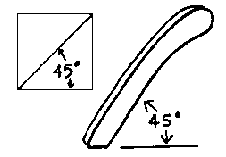
2. The wood lever is slightly shorter than the tray. Make
sure the bottom edge is angled so that the lever sits on the base at
a 45 degree angle.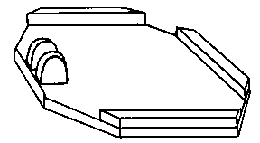
3. Place 2 small pieces of wood upright in the center of
the fourth side, leaving space between them for the lever.
|
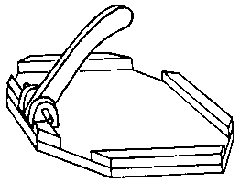
4. With the lever in place (at 45 degrees), drill a
hole of about 6 mm (1/4 inch) in diameter through the middle of the
3 pieces. Enlarge the hole in the lever slightly (so it will move
easily). Make a peg from a rod of hard wood, so that it fits tightly
between the 2 side-pieces. If fitted correctly, the lever should
move easily and stop at 45 degrees. When satisfied, glue the peg in
place and trim off the ends. Now fasten the remaining edge pieces on
either side of the lever.
5. Make a handbar from a small piece of wood. It
should be big enough for a hole to be drilled through its center.
Thread a piece of strong thin rope through the hole. |
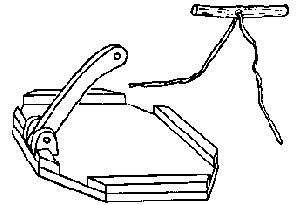
6. Drill a hole through the free end of the
lever. Be sure the hole is exactly over the center of the
tray when the lever is fully raised.
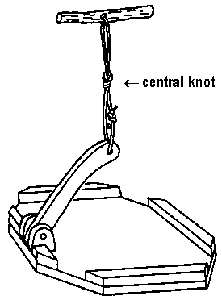
7. Knot the center of the rope. This is very important.
Without this central knot, the objects on the tray will move in a
different direction to the tray, and fall off or spill. Pull the
rope through the hole in the handbar and tie it firmly, so that the
handbar is connected firmly to the lever.
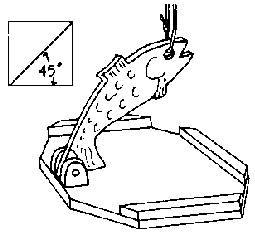
Note: To make the tray more fun, the lever can
be cut in the shape of another design - for example, a fish.
|
|
|