CHAPTER 42
Range-of-Motion and Other Exercises
All children need exercise to keep their bodies strong, flexible, and healthy. Most village children get all the exercise they need through ordinary daily activity: crawling, walking, running, climbing, playing games, lifting things, carrying the baby, and helping with work in the house and farm.
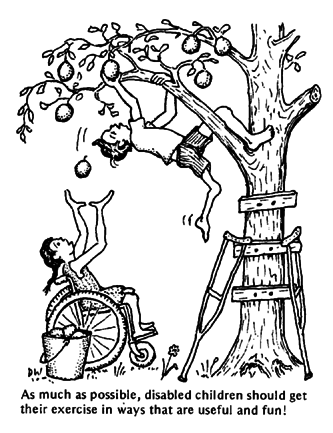
As much as is possible, disabled children should get their exercise in these same ways. However, sometimes a child's disability does not let him use or move his body, or parts of it, well enough to get the exercise he needs. Muscles that are not used regularly grow weak. Joints that are not moved through their full range of motion get stiff and can no longer be completely straightened or bent (see Chapter 8 on contractures). So we need to make sure that the disabled child uses and keeps strong whatever muscles he has, and that he moves all the parts of his body through their full range of motion. Sometimes a child may need help with these exercises. But as much as possible, he should be encouraged to do them himself, in ways that are useful and fun.
Different exercises for different needs
Different kinds of exercises are needed to meet the special needs of different children. On the next two pages we give an example of each kind of exercise. Then we look at some of the different exercises in more detail.
| Purpose of exercise | Kind of exercise | Pages with good examples |
| To maintain or increase joint motion | 1. range-of-motion exercises (ROM) 2. stretching exercises |
224, 368, 378 |
| To maintain or increase strength | 3. strengthening exercise with motion:
exercises that work the muscles and move the joint against
resistance 4. strengthening exercises without motion: exercises that work the muscles without moving the joint |
368, 378, 388 |
| To improve position | 5. practice at holding things or doing things in good positions | 96, 149, 164 |
| To improve control | 6. practice doing certain movements and actions, to improve balance or control | 306, 325, 369 |
DIFFERENT KINDS OF EXERCISES AND WHEN TO USE THEM
1. Range-of-motion exercises (ROM)
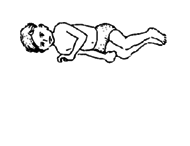
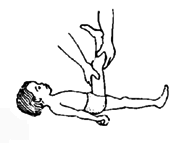
| Ram is 2 years old. Two weeks ago he became sick with polio and both legs became paralyzed. |
|
| Ram needs range-of-motion exercises to keep the full motion of his joints, so they will not develop contractures (see Page 370). |
|
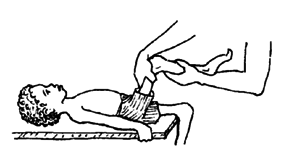
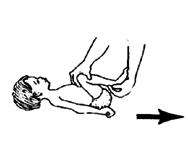
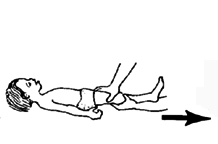
| At least 2 times a day, his mother slowly bends, straightens, and moves all the joints as far as they normally go. |
|
| All these are exercises for his knee. For other ROM exercises he needs,see Page 378 to 381. |
|
2. Stretching exercises
| Lola, who is now 4, had polio at age 2. She did not have any
exercises to keep the range of motion in her joints, and now she
has severe contractures especially of the
knees.
|
| Lola's mother does stretching exercises several times a day,
to straighten the joints a little more each day.
Stretching exercises are like ROM exercises, but the joint is
held with firm, steady pressure in a position that slowly
stretches it.
|
3. Strengthening exercises with motion
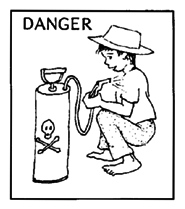
Chon was 6 years old when he got his clothes and body wet with a poison his father used to kill weeds. A week later his legs became so weak he could not stand. Now, 2 months have passed, and Chon is a little stronger. But he still fails when he tries to stand.
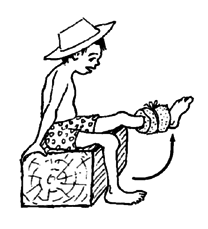
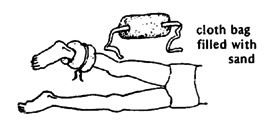
To help strengthen the weak muscles in his thighs, Chon can raise and lower his leg like this-first without added weight and later with a sandbag on his ankle. As his leg gets stronger the weight can be increased.
4. Strengthening exercises without motion
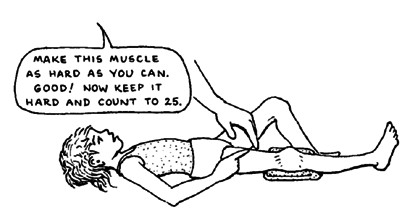
Clara, who is 9 years old, has a very painful knee. It hurts her to move it and her thigh muscles have become so weak she cannot stand on the leg. She cannot do exercises like Chon does because it hurts her knee too much.
But Clara can do exercises to strengthen her leg without moving her knee. She holds it straight and tightens the muscles in her thigh.
For more information on 'exercises without motion', see Page 140.
5. Exercises to improve position
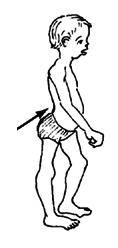
Ernesto is 8 years old and has early signs of muscular dystrophy. Among other problems, he is developing a swayback. |
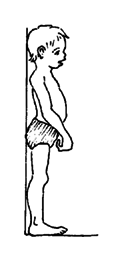
Ask Ernesto to stand against a wall and to pull in his stomach so that his lower back comes as close to the wall as possible. Ask him to try to always stand that way, and praise him when he does. |
| Because swayback is often partly caused by weak stomach
muscles, strengthening the stomach muscles by doing 'sit-ups'
may also help. See if Ernesto can still do sit-ups - at least
part way, and have him do them twice a day.
It is best to do sit-ups with the knees bent. (With legs straight the hip-bending muscles may do more work than the stomach muscles.) |
6. Exercises to improve balance and control
Celia is 3 and still cannot walk without being held up. She has poor balance. Many exercises and activities might help her improve her balance and control of her body. Here are 2 ideas for different stages in her development. For other possibilities, see Chapter 35 on Early Stimulation.
Play games with her to see if she can lift one leg, and then the other.
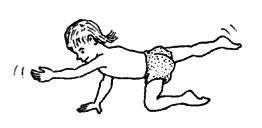
This will help her shift her weight from side to side and keep her balance.
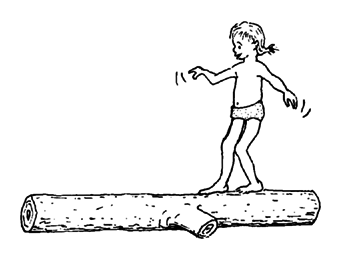
After Celia has learned to walk alone, if she still seems unsteady, walking on a log or narrow board may help her to improve her balance.
COMBINED EXERCISES
Often several kinds of exercises, involving different parts of the body, can be done through one activity-often an ordinary activity that children enjoy.
For example, Kim, who is 8 years old, had polio as a baby. His right leg is weak, his knee does not quite straighten, and the heel cord of his right foot is getting tight. He is also developing a swayback.

Many of the exercises Kim needs he can do by riding a bicycle.
The biking position helps improve the position of his back.
The movement of pedaling gives range-of-motion and stretching exercises to his knee.
Pushing the pedal down strengthens the thigh muscle.
Pushing down on the pedal stretches the tight heel cord.
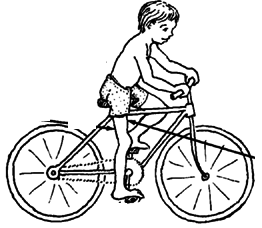
Learning to ride improves his balance and his control, so that all parts of his body work smoothly together.
| Note: Ordinary activities that exercise the whole body, like riding a bicycle or swimming, can provide many of the exercises that a child needs. But sometimes specific exercises using special methods are needed. Some special exercises are included in this chapter. |
RANGE-OF-MOTION (ROM) EXERCISES
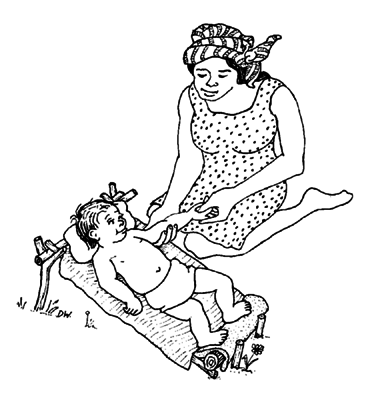
What are they?
Range-of-motion exercises are regularly repeated exercises that straighten or bend one or more joints of the body and move them in all the directions that a joint normally moves.
Why?
The main purpose of these exercises is to keep the joints flexible. They can help prevent joint stiffness, contractures, and deformities.
| Range-of-motion exercises are especially important for prevention of joint contractures. This danger is greatest when paralysis or spasticity causes 'muscle imbalance'- which means the muscles that pull a joint one way are much stronger than those that should pull it the other way, so that the joint is continuously kept bent or kept straight (see Page 78). |
![]()
Who should do them?
Range-of-motion exercises are important for:
| babies born with cerebral palsy, spina bifida, club feet, or other conditions that may lead to gradually increasing deformities. | |
| persons who are so sick, weak, or badly injured that they cannot get out of bed or move their bodies very much. | |
| persons who have an illness or injury causing damage to the
brain or spinal cord, inclucling: • polio (during and following the original illness) • meningitis or encephalitis (infections of the brain) • spinal cord injury • stroke (paralysis from bleeding or blood clot in the brain, mostly in older adults, see Where There Is No Doctor, Page 327) | |
| children with parts of their bodies paralyzed from polio, injury, or other causes, especially when there is muscle imbalance, with risk of contractures. | |
| children with progressive nerve or muscle disease, including muscular dystrophy and leprosy. | |
| children who have lost part of a limb (amputation). |
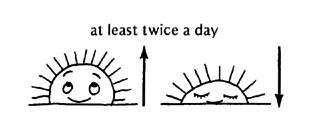
How often?
ROM exercises should usually be done at least 2 times a day. If some joint motion has already been lost and you are trying to get it back, do the exercises more often, and for longer each time.
When should range-of-motion exercises be started?
Early! Start before any loss in range of motion begins. With gentleness and caution, help a severely ill or recently paralyzed child to do range-of-motion exercises from the first few days. For precautions, see Page 374 to 376. Starting range-of-motion exercises EARLY can reduce or prevent disability.
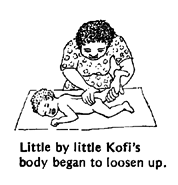
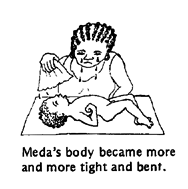
 KOFI AND MEDA

Kofi and Meda got meningitis on the same day. With quick, good medical treatment both survived. But both had suffered brain damage that left their bodies stiff and bent.
From the time his fever dropped, Kofi's mother did exercises with him-2 times every day. As he got better, she also played with him a lot-in ways that helped him stretch and bend all joints as much as possible.
Meda's mother cared for her child as best she could, but no one told her about exercises. In both children the muscle spasms gradually went away. By 6 months both could control their body movements almost normally. Because Kofi's joints were kept flexible, as his muscle control came back he learned to use his body nearly as well as any child his age. When Meda's muscle control returned, his muscles had shortened so much that he could not straighten his hips or knees enough to walk. He could only crawl, and his body became more and more deformed.
It is much easier to prevent these problems than to correct them. |
For how long should range-of-motion exercises be continued?
To prevent contractures or deformities, range-of-motion exercises often need to be continued all through life. Therefore it is important that a child learn to move the affected parts of his body through their full range of motion as part of work, play, and daily activity. If the range of motion remains good, and the child seems to be getting enough motion through daily activities, then the exercises can be done less often. Or simply check every few weeks to be sure there is no loss in range of motion.
Which joints?
Exercise all the joints that the child does not move through normal range of motion during her daily activities. For a child who is very ill or newly paralyzed, this may mean exercising all the joints of the body. For a child with one paralyzed limb, range-of-motion exercises usually only need to be done with that limb (including the hip or shoulder). Children with arthritis may need range-of-motion exercises in all their joints, including the back, neck, and even jaw and ribs.
GUIDELINES FOR DOING STRETCHING AND RANGE-OF-MOTION EXERCISES
1. When doing these exercises, consider the position of the whole child, not just the joint you are moving. For example:
| The knee will often straighten more (and you will be
stretching different muscles) when the hip is straight,
|
| than when the hip is bent.
|
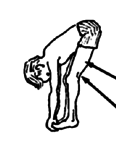
| This is because some muscles go from the hipbone to below
the knee.
To prove this, try to touch your toes with your knees straight. You will feel the muscles stretch, and the cords tighten here. |
In a similar way, movement in the ankle is affected by the
position of the knee
(see Page 29), and movement of the
fingers by the position of the wrist (see Page 375).
2. If the joints are stiff or painful, or cords and muscles are tight, often it helps to apply heat to the joint and muscles before beginning to move or stretch them. Heat reduces pain and relaxes tight muscles. Heat can be applied with hot water soaks, a warm bath, or hot wax. For methods, see Page 132 and 133.

For a stiff, painful joint, |
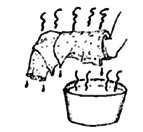
apply heat for 10 or 15 minutes |

before doing the exercises. |
3. Move the joint SLOWLY through its complete range of motion.
It the range is not complete, try to stretch it slowly and gently just a little more each time. Do not use force, and stop stretching when it starts to hurt.
| Hold the limb in a stretched position while you count to
25.
|
| Then slowly stretch the joint a little more and hold it
again for a while.
|
| Continue this way until you have stretched it as far as
you can without forcing it or causing rnuch pain.
|
The more often you repeat this, the faster the limb will get straighter.
4. Have the child herself do as much of the exercise as she can. Help her only with what she cannot do herself. For example:
| Instead of doing the child's range-of-motion exercise for
her,
|
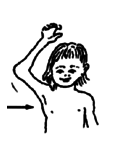
have her do the exercise using her own muscles as much as she can. |
| Then have her help with the other hand (or you help her if
necessary).
|
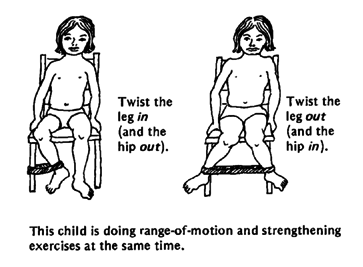
| Whenever possible, exercises that help to maintain or increase joint motion should also help to maintain or increase strength. In other words, range-of -motion, stretching, and strengthening exercises can often be done together. |
THERE ARE 3 MAIN WAYS OF DOING RANGE-OF- MOTION EXERCISES
| 1. Passive exercise. If the child cannot move the limb at all, either you can do it for him ... |
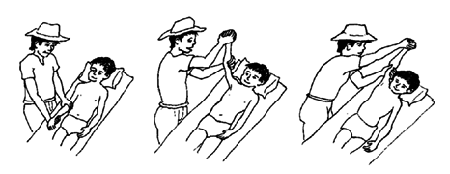
|
| or he can move the limb through its full range with another part of his body. |
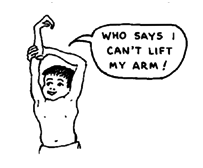
|
2. Assisted exercise. It the child has enough strength to move the affected part of her body a little, have her move it as far as she can. Then help her the rest of the way.
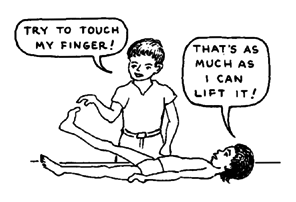
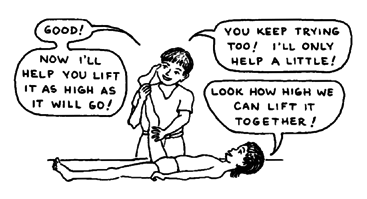
3. Active exercise. if the child has enough strength to move the body part by itself through its full, normal range of motion, then he can do the exercises without assistance, or 'actively'. When the child can do it, active exercise is usually best, because it also helps maintain or increase strength.
| If muscle strength is poor, have the child move his limb
while in a position so that he does not have to lift its
weight.
If necessary, support the limb with your hands, in a sling, or on a small roller board. |
| If he can lift the weight of his limb through its full
range of motion, let him exercise in a position to do it. For
example, he can lie on his side and lift his leg up sideways.
|
| If he can lift the limb's weight easily, add resistance by
pushing against the limb or by tying a sandbag to it. This
helps strengthen the muscles for that motion.
|
As the child gains strength, gradually increase resistance (add more weight).
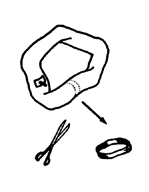
For many exercises, resistance can be added with stretch bands. Cut rubber bands from an old inner tube. The wider the band, the more resistance it will give.
COMMON SENSE PRECAUTIONS WHEN DOING EXERCISES
Every child's needs are different. Please do not simply do, or recommend, the same exercises for each child. First THINK about the child's problems and needs, what exercises might help her most, and what could possibly harm her. Adapt the exercises to the child's needs, and to how she responds. Here are some important precautions.
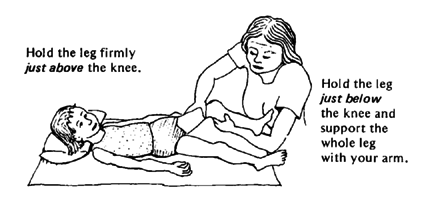
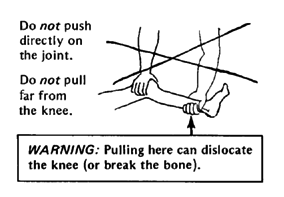
1. Protect the joint. Weak joints can easily be damaged by stretching exercises, unless care is taken. Hold the limb both above and below the joint that you are exercising. And support as much of the limb as you can.
![]()
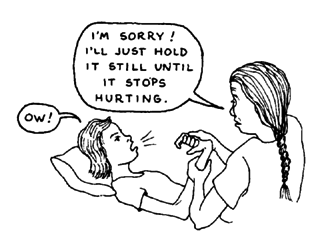
2. Be gentle-and move the joints SLOWLY-especially when a child has spasticity, or when joints are stiff or painful.
| WARNING: Moving spastic joints
rapidly makes them stiffer. SLOW DOWN! |
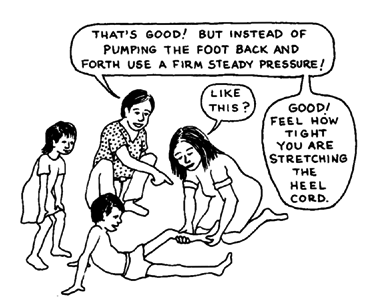
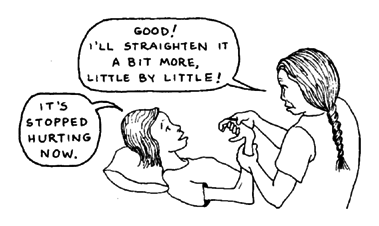
For example, Teresa has juvenile arthritis and her joints are very painful. She holds them in bent positions that are leading to contractures. Move the joints very slowly and gently, as far as you can without causing too much pain. Straighten them little by little, like this:
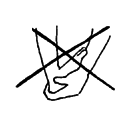
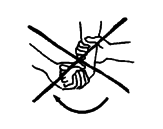
| A common mistake is to rapidly move the limb back and forth like the handle of a pump. This does no good and can do harm. Go slow, with gentle, steady pressure. |
3. Do no harm. In children who have recently broken their neck, back, or other bones, or who have serious injuries, exercises should be done with great caution. Be careful not to move the broken or injured part of the body. This may mean that some joints cannot be exercised until the bones have joined or wounds healed. (For broken bones, usually wait 4 to 6 weeks.)
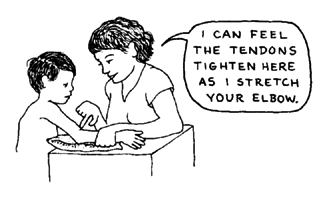
4. Never force the motion. Stretching will often cause discomfort, but it should not be very painful. If the child cannot tell you, or does not feel, be extra careful. Feel how tight the cords are to be sure you do not tear them.
5. Do not do exercises that will increase the range of motion of joints that are 'floppy' or that already bend or straighten more than they should.
| If a child has ankles that already bend up too much,
|
| do not do ROM or stretching exercises that pull
the foot up.
|
| Or if a child's foot bends in more than normal,
but does not bend out,
|
| do exercises to bend the foot out,
|
| but do not do exercises that bend the foot
in.
|
Do exercises in the opposite direction of the deformity or contracture, so that they help to put the joint into a more normal position.
6. Before doing exercises to increase the range of motion in certain joints, consider whether the increased motion will make it easier for the child to do things. Sometimes, certain contractures or joint stiffness may actually help a child to do things better.

For example, a child with a short leg may walk better if a tight heel cord keeps his foot in a tiptoe position. |
| Similarly, a child with paralysis in the thigh muscles may actually walk better if a tight heel cord prevents his foot from bending up. (See Page 530.) |
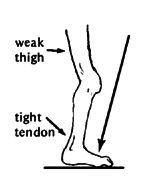
This foot does not bend up. The tight heel cord holds the leg back and keeps the knee from bending. |
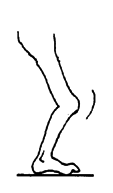
Stretching exercises to bend the foot up may cause the weak knee to bend when the child tries to walk. |
A child with cerebral palsy or arthritis often needs exercises to maintain or improve the movement of the back. However, a child with spinal cord injury or muscular dystrophy may do better if the back is allowed to stay stiff -especially if it is in a fairly good position.
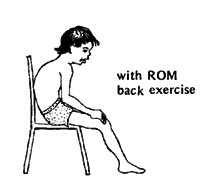
Because of their weak back muscles, these children often develop a slouched or hunchback position. Range-of-motion exercise to increase flexibility could make the posture worse!
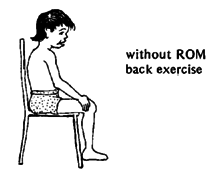
Allowing the child's back to stiffen in a good position may help him to sit straighter.
In persons with quadriplegia or other paralysis that affects the fingers, avoid stretching open the fingers with the wrist bent back.
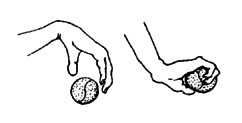
A quadriplegic person with no muscle power in his fingers can often pick things up by bending the wrist back. Tight cords make the fingers bend.
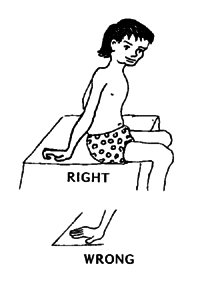
For the same reason, the quadriplegic child should also learn to support herself on her hands with her fingers bent, not straight.
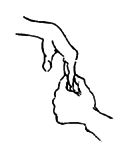
RIGHT
To keep this holding function, straighten fingers with wrist bent
down,
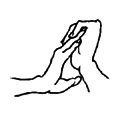
WRONG
DO not stretch the fingers with the wrist bent back.
7. In doing range-of-motion exercises for a stiff neck, caution is needed to make sure the neck bones do not slip and cause damage to the spinal nerves. This damage can cause total paralysis or even death. The danger is especially great in persons with arthritis, Down syndrome, or neck injury. Do not use any force to help the person bend her neck. Let her do it herself, slowly, with many repetitions, and without forcing.
![]()
8. In children with cerebral palsy, sometimes the standard range-of-motion exercises will increase spasticity and make bending or straightening of a particular joint difficult or impossible. Often the spastic muscles can be relaxed by positioning the child in a certain way before trying to exercise the limb. For example:
When a child with spasticity lies straight his back, his head and shoulders may push back. His legs also stiffen and will be hard to bend.
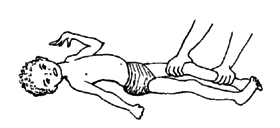
It may be very hard to bend the spastic legs of a child in this position.
But if we position the child with his back, shoulders, and head bent forward, this helps to relax his stiff legs and will make motion easier.
It may also help to rotate the leg outward before trying to bend the knee.
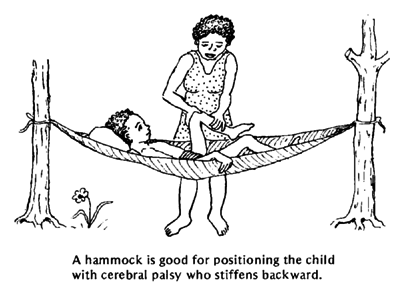
| REMEMBER: Fast movements
increase spasticity. Do exercises VERY SLOWLY. |
| CAUTION:Range-of-motion exercises are very important for many children with spasticity, but special techniques are needed. More examples of how to relax spasticity are given in Chapter 9 on cerebral palsy. However, you can learn a lot by trying different positions until you find the ones that help relax the spasticity. |
9. In joints where there is muscle imbalance (see Page 78), do exercises to strengthen the weaker muscles, not the stronger ones. This will help to prevent contractures by making the muscle balance more equal.
If the muscles that straighten the knee are weak,

and the muscles that bend the knee are strong,
![]()
then do exercises that strengthen the weaker side.
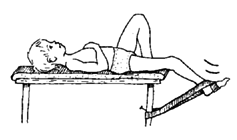
This will make stronger the muscles that straighten the knee. It helps prevent contractures.
![]()
Do not do exercises that strengthen the stronger side.
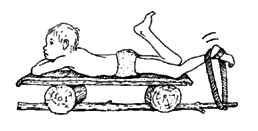
This will make the muscles stronger that bend the knee-and make contractures more likely.
In daily activities, also, look for ways to give weak muscles more exercise than strong ones. This advice is discussed in more detail in Chapter 16 on juvenile arthritis.
IDEAS FOR MAKING EXERCISES FUN
Exercises can quickly become boring, and the child will not want to do them. So turn them into games whenever possible.
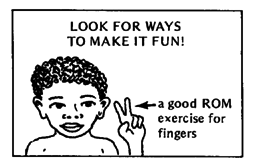
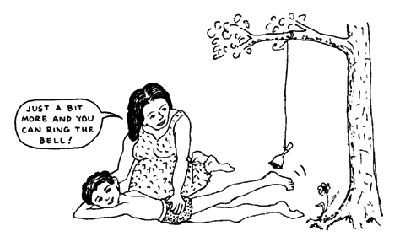
One good way is to involve the children in games with other children. Try to think of ways to adapt games so that they help to stretch the joints and exercise the muscles that most need it.
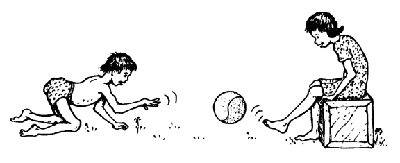
A boy with cerebral palsy rolls a ball so that a girl with juvenile arthritis can kick it. This helps her to straighten her knees, and to strengthen the muscles that straighten them.
In the picture below, children play ball to help María, a girl with juvenile arthritis, stretch her stiff joints and muscles.
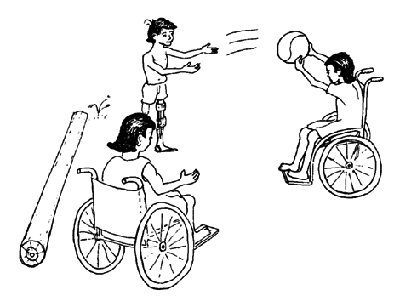
Can you see how the 2 children on the left are helping María with 'range-of -motion' exercises?
Which of María's joints are they exercising?
Answers:
The children form a triangle, so that to catch the ball María has to twist her body to one side, and to throw it she has to twist to the other side. This helps loosen her stiff back and neck. Also, sometimes they throw the ball high so that she has to lift her head and raise her arms high to catch it.
This way María exercises her neck, back, shoulders, elbows, wrists, hands, and fingers. And the play helps her forget the pain of movement-pain that often makes range-of-motion exercises seem like punishment. But this way she has fun.
Complete range-of-motion exercises-upper limbs*
Do these exercises slowly and steadily. Never use force, as this could damage a joint.
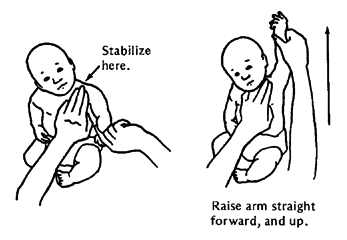
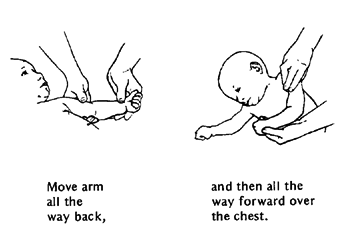
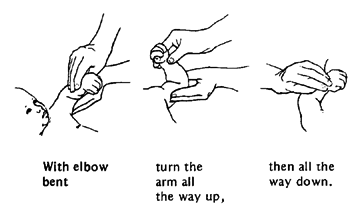
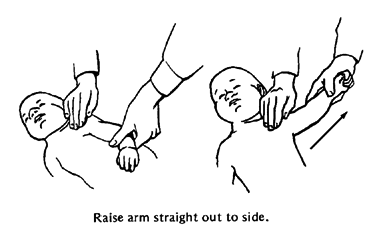
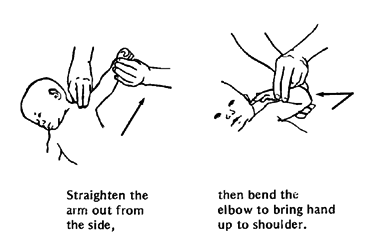
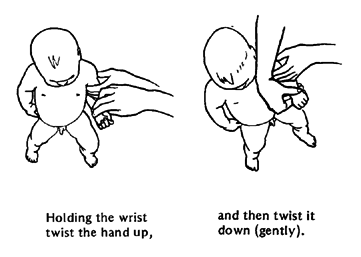
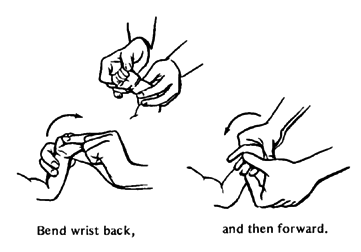
Do one joint at a time. Hold the limb steady (stabilize it) with one hand just above the joint, and place your other hand below the joint to move the part through its full range of motion. Here we show the basic exercises only. But remember, try to do them in ways that make it fun!
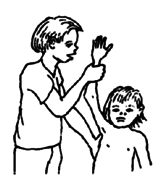
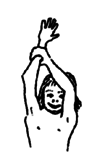
| SHOULDER: arm up and down
|
| SHOULDER: arm back and forward
|
| SHOULDER: rotation
|
| SHOULDER: out to side
|
| ELBOW: straighten and bend
|
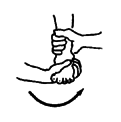
| FOREARM: twist
|
![]()
*Drawings on pages 378 to 380 are adapted from Range-of-Motion by Hewitt/Jaeger. (See Page 640.)
| WRIST: up and down
|
| WRIST: side to side
|
| FINGERS: close and open
|
| FINGERS: spread
|
| FINGERS: straighten while bent at hand
|
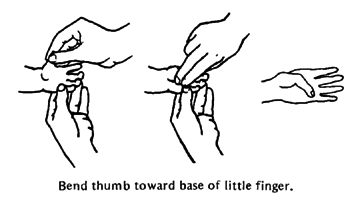
| THUMB: for grasping
|
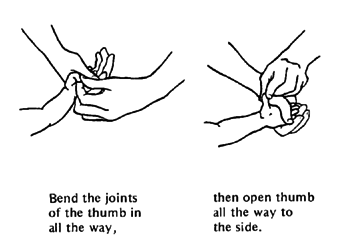
| THUMB: shut and open
|
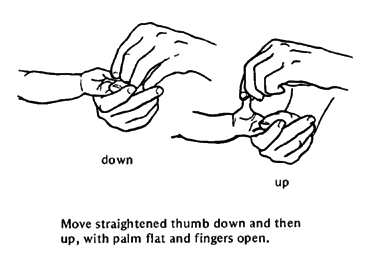
| THUMB: tip and down
|
Range-of -motion exercises - lower limbs
(Also see the exercise sheets on pages 382 to 386.)
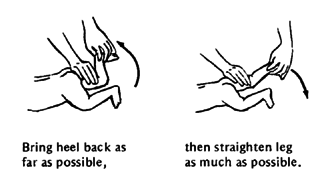
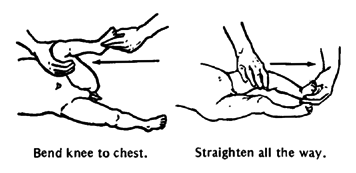
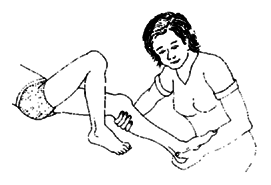
| KNEE
|
| HIP: straighten (Also see Page 385)
|
| HIP: bend
|
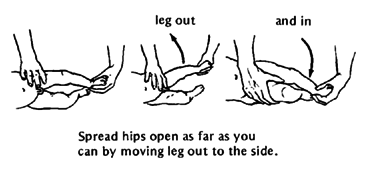
| HIP: spread
|
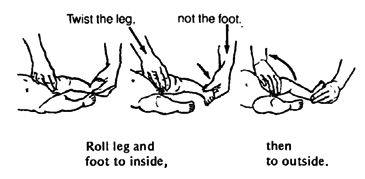
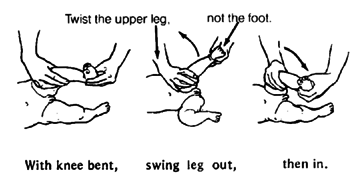
| HIP: twist (rotation) - leg straight
|
| HIP ROTATION: leg bent
|
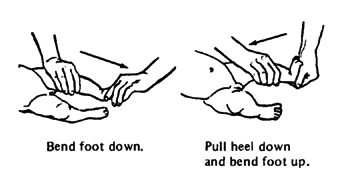
| ANKLE AND FOOT:: down and up (Also see Page 83.)
|
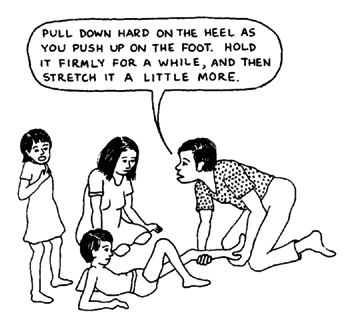
| IMPORTANT: To stretch a
tight heel cord, pull heel down as you push foot up.
Pull heel harder than you push on foot-or you may dislocate foot upward instead of stretching the ankle cord and muscles. (See Page 382and 383.) |
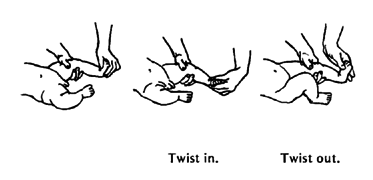
| ANKLE TWISTING: in and out
|
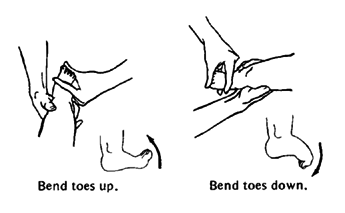
| TOES: up and down
|
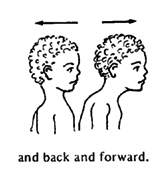
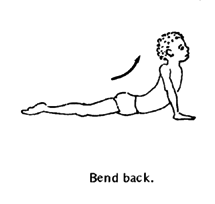
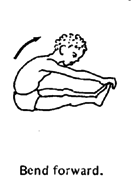
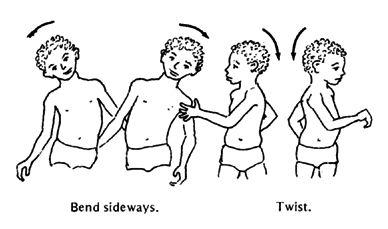
Range-of -motion exercises - neck and trunk
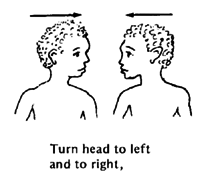
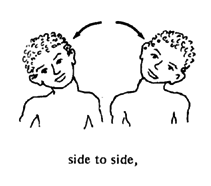
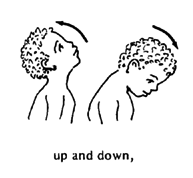
We show these as active exercises. Usually they should be done by the person himself. If any help is given it should be very gentle, with no force, especially when exercising a stiff neck. (See precaution on Page 376.)
| NECK
|
|
| TRUNK
|
|
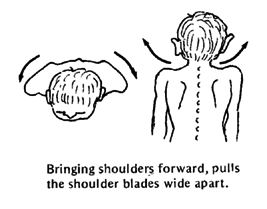
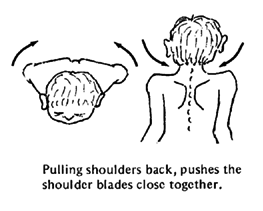
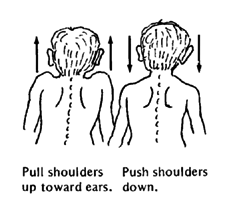
| UPPER BACK (shoulder
blades):
|
|
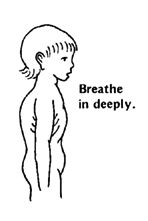
| RIBS
|
|
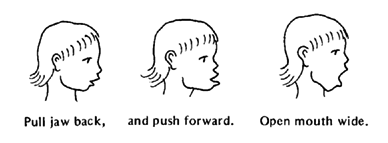
| JAW
|
|
EXERCISE INSTRUCTION SHEETS -For Giving To Parents
If you give the family pictures of the exercises that their child needs, they will be more likely to do them-and do them right.
On the next few pages are samples of exercise sheets that you can copy and give to families. They show some of the home exercises that we have found are needed most often.
However, these exercise sheets should not be a substitute for hands-on demonstration and guided practice. Instead, give them to the family after you teach them how to do the exercises. In teaching an exercise or activity:
| 1. First show and explain.
|
| 2. Next have the family and child practice until they
do it right and understand why.
|
| 3. Then give her the instruction sheets and explain
the main ideas again.
|
| 4. For exercises to correct contractures, consider
giving the family a 'flexikin'. Show them how to measure
and record the child's progress. This lets them 'see' the
child's gradual improvement, so they are likely to work
harder at the exercises. (See "Flexikins" in
Chapter 5.)
|
You may want to prepare more sheets showing other exercises, activities, or play ideas that are included in this book. Better still, make sheets showing exercises and activities in ways that fit your local customs and that help the child to take part in the life of the community. (See Chapters 1 and 2.)
STRETCHING EXERCISE - TO HELP YOUR CHILD PUT HER FOOT DOWN FLAT (TO CORRECT A'TIPTOE' CONTRACTURE)

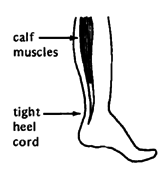
PROBLEM The muscles at the back of the lower leg (calf muscles) that hold the foot 'tiptoe', are too short and tight. For this reason the child cannot put her foot flat on the ground. |
Use your arm to hold the foot in position like this. Gently lift but do not force the foot upward.
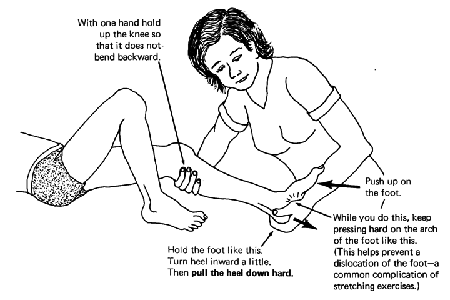
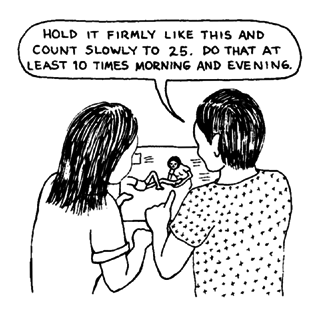
Pull down on the heel and push up on the foot, firmly and steadily while counting slowly to 25. Relax, then do it again. Repeat this exercise 10 to 20 times-in the morning, at noon, and in the evening.
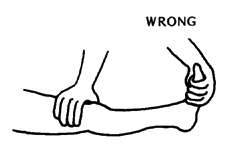
| WARNING: Pushing here can injure the knee or
cause it to bend backward - especially if the upper leg is
weak.
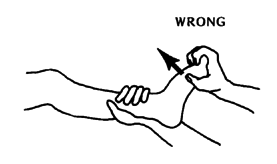
Pushing like this can hurt or dislocate the foot instead of stretching the cord - especially if the foot is paralyzed or very weak.
|
STRETCHING EXERCISE - TO STRAIGHTEN A STIFF KNEE (KNEE CONTRACTURE)

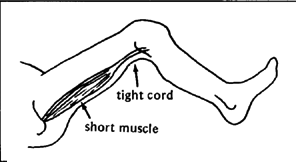
PROBLEM The muscle and cord here are too short and tight. For this reason the knee will not straighten. |
Ask the child to straighten his knee as much as he can by himself (if he can do it at all). Then help him slowly straighten it as far as it will go.
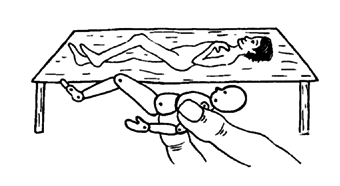
Both of you keep working to hold the knee as straight as possible while you count slowly to 25. Repeat several times. Do this exercise 3 times a day.
If the foot also has a contracture, try to hold or bend it up while you stretch the cord behind the knee.
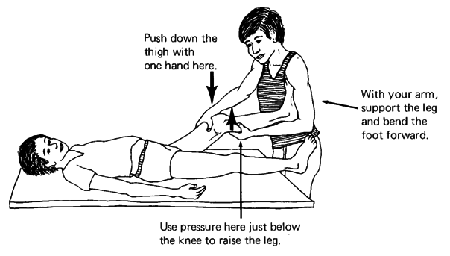
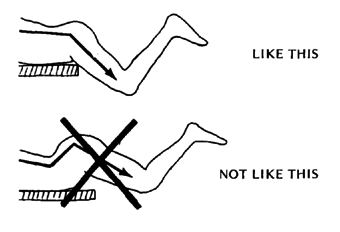
When you get the knee as straight as you can with the hip extended, gradually lift the leg higher, keeping the knee straight.
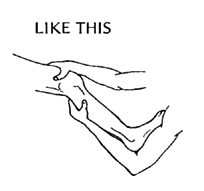
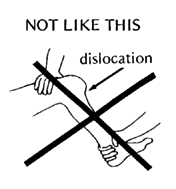
BE CAREFUL. Never try to straighten the leg by pulling the foot. Instead of stretching the cord, this could dislocate the knee or break the leg. The danger is especially great when the leg is very weak or when the child cannot walk. |
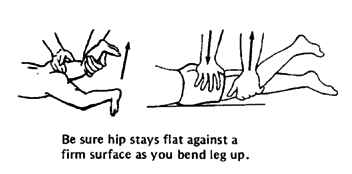
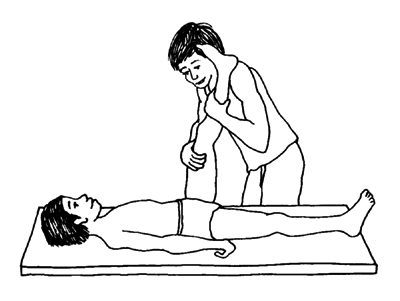
STRETCHING EXERCISE-FOR A BENT-HIP CONTRACTURE

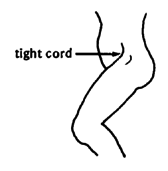
PROBLEM The thigh is pulled forward by tight cords and cannot straighten backward. |
Rest the thigh against your thigh, and support the leg with your arm.
With firm and steady force, pull the leg up while counting slowly to 25.
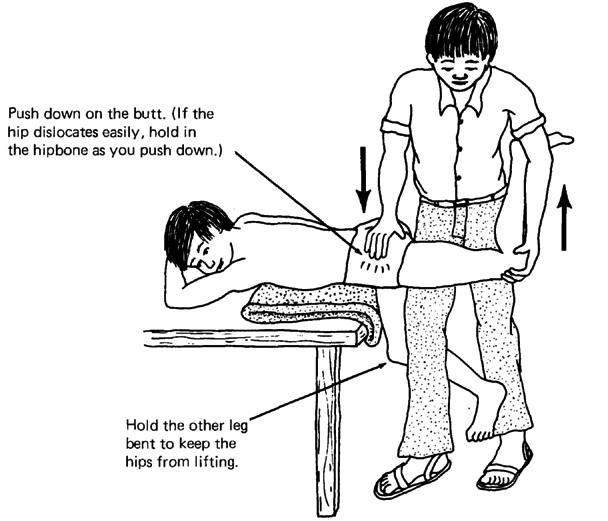
Repeat several times. Do this exercise 3 or more times a day.
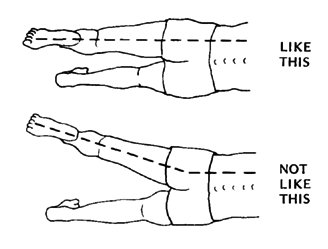
| VIEW FROM ABOVE Do the exercise with the leg in a straight line with the body.
|
| Make sure the hips are against the table and that they
do not lift up as the leg is lifted.
|
EXERCISES AND POSITIONS TO HELP AVOID PRESSURE SORES AND CONTRACTURES

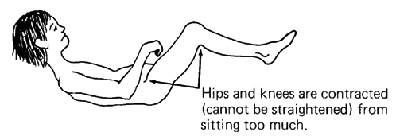
Children who spend a lot of time lying or sitting, or have lost feeling in their butts, should NOT SPEND ALL DAY SITTING DOWN. This can cause pressure sores, contractures of the hips and knees, and back deformities.
| PREVENT THIS |
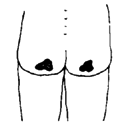
Pressure sores |
| PREVENT THIS |
| Contractures
|
When you spend time sitting in a wheelchair (or any chair) lift yourself up with your arms like this and count to 25 every 15 or 20 minutes.
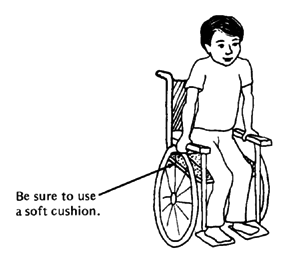
Lifting up often is especially important for people who do not have feeling in their butt, so that they do not get sores on their bottom.
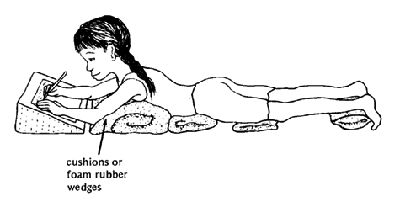
Spend a part of the day lying down with your shoulders up like this. (For other designs see Page 199 and 500.)
You can do schoolwork lying down. Try to arrange things with the teacher so that you can spend part of your day lying down.
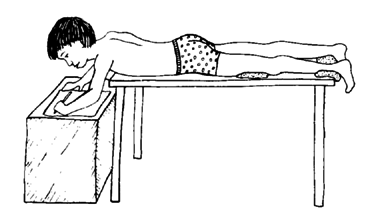
If the child cannot straighten enough to lie on the floor, he can lie on a table, and work or play with his hands at a lower level, as shown here.
| BE CAREFUL: To avoid sores, it is important to put foam rubber cushions to protect the body where bones press against skin-especially if you cannot feel in parts of your body. |
EXERCISE FOR A STRAIGHTER BACK

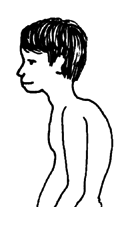
PROBLEM The upper back bends forward (in older persons this is a common cause of high back pain). Often the shoulders and shoulder blades are also stiff. |
Lie face down and move the arms as shown. This helps keep the shoulder blades and upper back flexible.
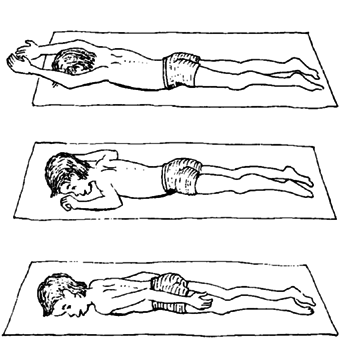
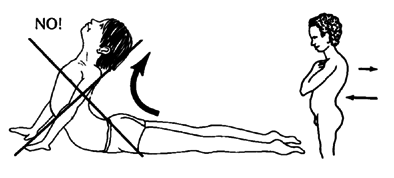
Put a strap around the upper body and bend backward as far as you can.

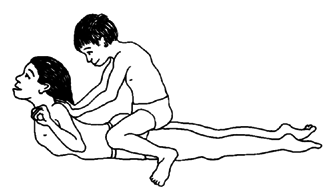
Or put pressure against the middle of the upper back and have the child try to straighten against it .
| CAUTION: Bending back like this usually bends
the lower back too much and does little or nothing to help
straighten the upper back. It may make the problem worse.
|
Stay in this position while you count to 25. Do the exercise 2 or 3 times a day.
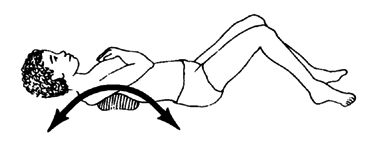
Also, for at least half an hour a day, lie with a rolled up towel or cloth under the middle of the curve in your back. Breathe deeply, and every time you breathe out, try to let your body bend backward over the roll.
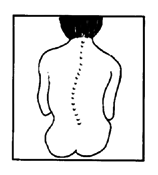
Note: Some experts believe that the exercises that bend the back up and back, as shown above, may also help keep a mild sideways curve of the spine (scoliosis) from getting worse. But the exercises will not help much if the curve is severe.
STRENGTHENING EXERCISES - TO GET ARMS READY TO WALK WITH CRUTCHES

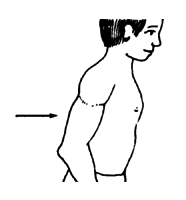
OBJECTIVE These exercises help make your arms stronger so that you can walk with crutches. |
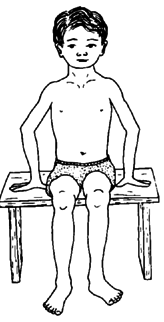
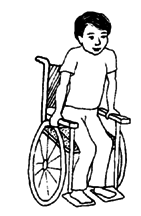
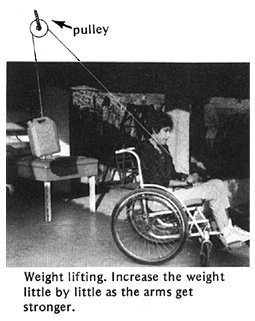
Sit like this and lift yourself up with your arms. |
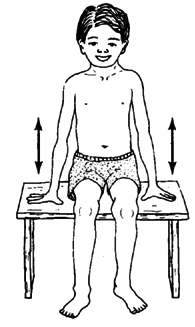
Go up and down until your arms are so tired you cannot lift yourself another time. |
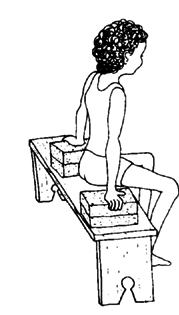
It is better to use bricks or books to lift yourself higher. |
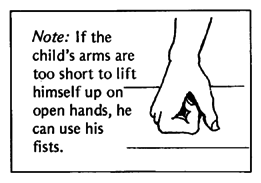
|
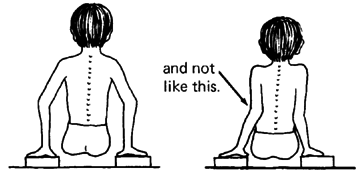
Try to lift yourself with your elbows out, like this, |
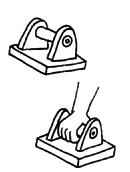
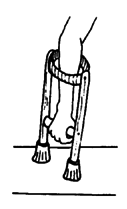
| To practice for using crutches, make
'handgrips'.
|
| Or use a sawed-off crutch.
|
| Or you can do these exercises in your
wheelchair.
|
Do these exercises 3 or 4 times a day. Every day try to lift yourself more times without resting, until you can do it 50 times.
STRENGTHENING EXERCISES-TO HELP YOUR CHILD HAVE STRONGER THIGHS

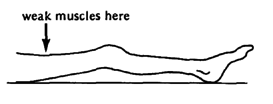
PROBLEM Weak muscles in the front part of the upper leg (thigh muscles) make it difficult to support weight with that leg. |
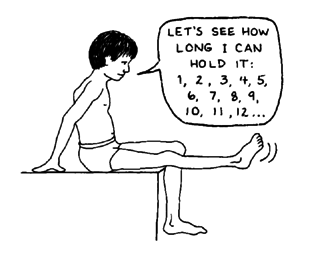
Raise your leg and hold it up until you cannot hold it up any longer. Then lower it as slowly as you can.
Repeat as many times as possible (until you cannot lift the leg more).
Do this exercise 2 or 3 times a day.
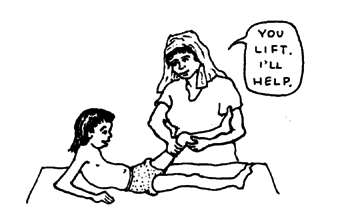
If the child cannot straighten her leg by herself, help her, but ask her to use all her strength too.
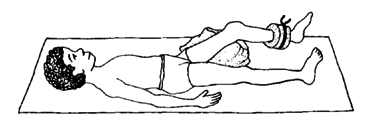
When his thigh is stronger, put a little bag of sand on his ankle so that he will use more strength to raise it.
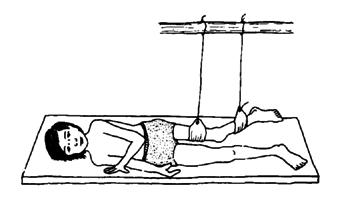
If her thigh is quite weak, have her straighten and bend her leg lying sideways. She may need to have the leg supported.
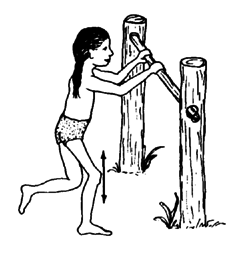
It also helps to stand on the leg, then bend as far as possible and straighten again. Repeat many times.
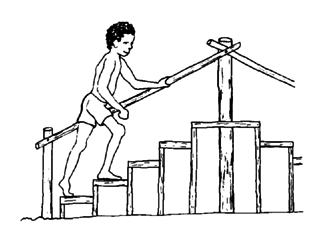
If the leg gets strong enough, practice going up and down steps. Start with low steps and slowly progress to higher ones.
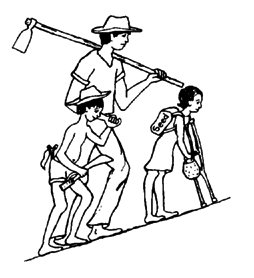
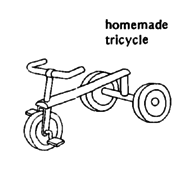
Climbing hills or riding a tricycle or bicycle also helps strengthen the thighs.
STRENGTHENING EXERCISE - FOR THE MUSCLES ON THE SIDE OF THE HIP

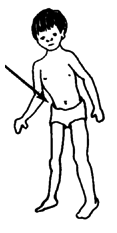
PROBLEM weakness here causes the child to bend to one side when he walks. |
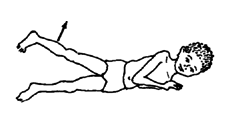
Lie on your side and raise your leg as high as you can.
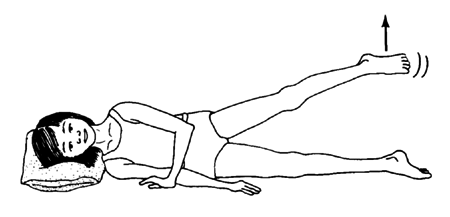
Keep your leg up until you get so tired that it falls by itself.
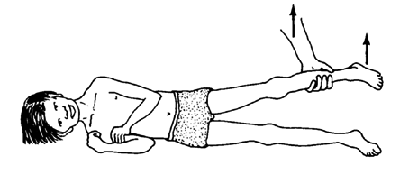
If the child cannot raise his leg by himself, help him a little, but be sure that he uses as much strength as he can.
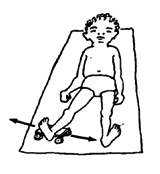
Or have the child lie on his back and move his leg to the side. You can hang the leg like this so that he can move it more easily.
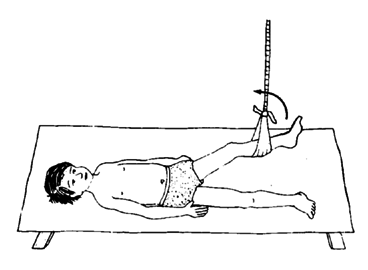
As he gets stronger, move the rope more to the other side to make him work harder.
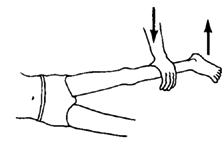
If the child can raise her leg easily, add weight with your hand, |
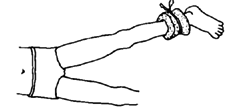
or with a little bag of sand. |
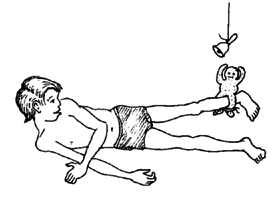
Think of ways to make the exercises fun. |
Repeat 3 times. Do this 3 times a day.
RANGE-OF-MOTION AND STRENGTHENING EXERCISES - FOR THE HAND AND WRIST

These exercises can help bring back or maintain strength and range of motion of the hand. They are useful after injuries (or surgery) to the hand, after broken arm bones near the wrist have healed, and for arthritis, or partial paralysis from any cause (polio, spinal cord injury, stroke).
To do these exercises, the person should move the hand as much as possible without help. Then, if motion is not complete, use another hand to bend and straighten the fingers or wrist as much as possible without forcing.
Repeat each exercise 10 to 20 times, at least 2 times every day.
1. Close and spread the fingers as much as possible.
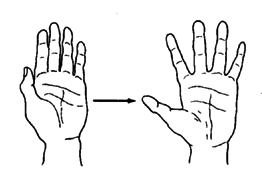
| 2. Open.
|
Bend like this.
|
Make a fist.
|
3. Make 'O's with the thumb and each finger.
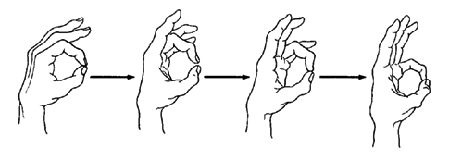
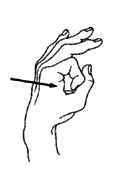
After you can make the large 'O's, repeat making the 'O' as small as you can.
4. Bend wrist forward and backward. (Backward is more difficult but is especially important.)
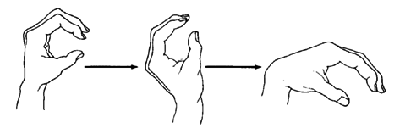
5. Spread and close the thumb.
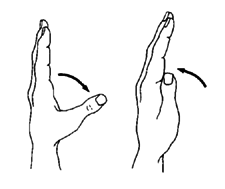
6. Bend the wrist from side to side.
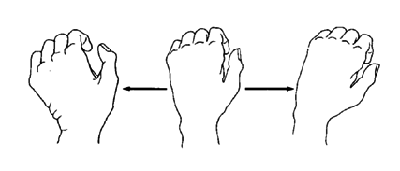
7. Turn hands upward and downward-as far as you can.
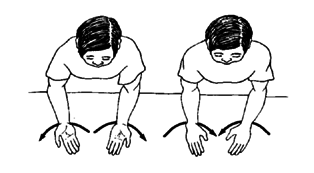
MAKING HAND EXERCISES FUN OR USEFUL
Look for ways to make hand exercises fun.
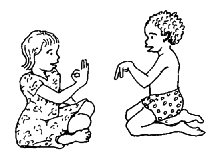
For example, try to learn sign language from a deaf child (see Page 266).
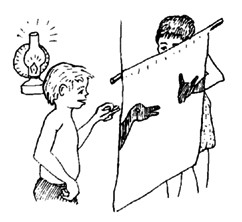
Or play 'shadow puppets' with a light.
Aids for hand exercise
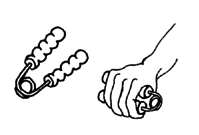
You can buy a simple hand exerciser like this.
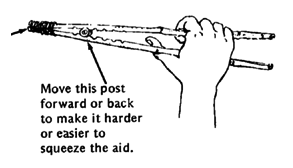
Or make one like this. If the child makes it herself, that will also be good exercise for her hands.
This 'acrobatic bear' is more work to make, but even more fun to exercise and play with.
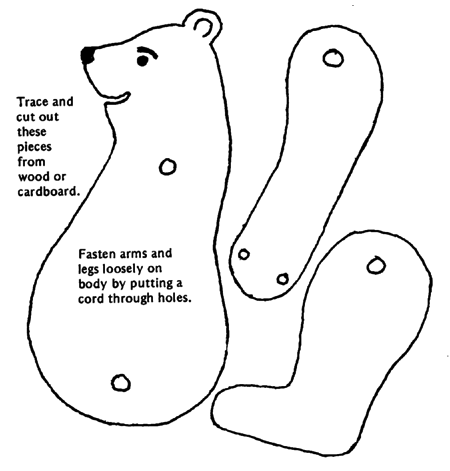
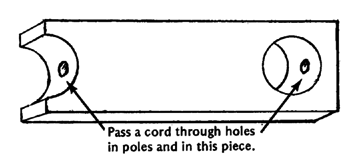
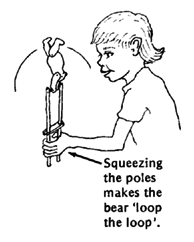
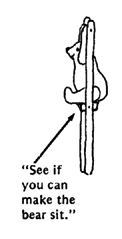
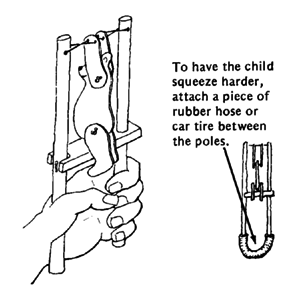

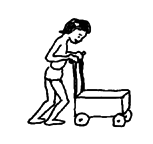
A child can also get squeezing exercise with the hands by milking goats, cutting with scissors or shears, punching holes in leather or paper with a hand punch (while making things), by washing and wringing clothes, and in many other ways.
For examples of how different kinds of exercises are used for different disabilities, look under 'Exercises' in the INDEX.
![]()
